As promised yesterday, here's a continuation of the front porch progress with a tutorial on how to make your own concrete countertops.
There are other tutorials out there on how to do this, but we kind of made up our own way of doing it. If you're going to tackle a similar project I recommend you look at several methods and decide what fits your style best. (And while you have the concrete mixed, check out some other things you can made as accessories with it.)
The first, and probably most important step in making your own counters is to measure accurately. We had a little jog that we had to account for in the shape of the counters and each side was slightly different in measurement so the forms had to be adjusted accordingly. Measure carefully!
After that you have to gather your materials. You'll need concrete (we used a countertop mix from Menards).
You'll also need melamine boards, found in any home improvement store (often used for shelving). The key is to find smooth boards if you want a smooth finish.
You'll also need to figure out what you want to use as a support within your counters. You don't want the counters to crack so you need something structural and sturdy inside them. You can buy rebar or make your own. Michael originally planned on making his own, but lucky for him his wife is a genius (ha!) and suggested taking a shortcut with some leftover items we had in the garage.
We used this as the support within the concrete: Can you guess what it is?
It is a shelf bracket from some old closet shelving we used to have. To be honest, I am not a fan of this type of shelving and prefer wood shelves over the metal systems. We sold most of the shelving we had but there were a few miscellaneous pieces left over and now they're buried in our concrete counters!
Basically, Michael cut the shelving down and tied it with plastic zip ties to hold it together. He added some bent pieces of metal that sat on the edge of the forms and enabled the shelving to be suspended in the middle of the concrete (you don't want it settling to the bottom of your form since it is the top of your counter).
For the forms themselves, remember that the bottom of your form will become to the top of your counter when you're finished. So cut a board slightly wider than the counter you need and then tack side boards around it to get the depth you want.
You'll also need to use some silicone caulk to fill in the gaps so your edges are nice and smooth. This edging tool was handy for spreading the caulk evenly inside the form.
Once your forms are ready, it's time to mix the concrete. A big plastic bin worked well for mixing. Just follow the instructions on the bag. We started out mixing it with the mixer attachment on a drill, but switched to using a shovel. Much easier.
After pouring the concrete into your forms, you can use a sander on the edge of the form to vibrate the concrete and bring the air bubbles out.
Lots of air bubbles.
We wanted to make sure the forms were completely filled, which meant overfilling them a little. We scraped the top with a board to make sure they were level with the top of the form. Warning - this is a super messy process.
After allowing the concrete to dry (we waited 48 hours) you can release the counter from the form using pliers to pull out the metal pieces that hung over the form and then breaking off pieces of the form.
Now here's the most nerve-wracking part...turning it over to see how the counter looks. Overall, we were thrilled with our first attempt at making these. You can see below that there is one part where the silicone wasn't smoothed down (oops), but you don't notice it in the installed version since there is caulking around the whole counter.
There were more bubbles in the top than we expected, but since it's an outdoor counter it's not a big deal. In the future I think we'd use the sander on the frame for a longer time. We sanded the whole top to make sure it was nice and smooth and then it was time to install it.
It fit beautifully! Like it was made for the space. :) The last step was to caulk around the edges of the stone and concrete so everything was sealed well.
We decided not to seal the concrete top because we tossed around the idea of coloring it a little in the future. Maybe we'll end up sealing it...not sure yet.
Other than the concrete top, the final thing we had to do to finish the front porch was trim out the bottom of the columns. They turned out great!
And here's the before and after again:
It is so great to finally have ONE whole area finished. I can't wait for the holidays this year so I can decorate out here. We added outlets on the outside since we didn't have any before so I can actually have lights outside! Can't wait!
Aug 13, 2013
Aug 12, 2013
a porch in the making
We have ONE area in our entire house that we are declaring FINISHED...the front porch. And wow it feels great to have a big project done. It's the 'hello' you see when you get to our house and it has come a llllloooonnnngggg way.
We liked the look before, but soon after we moved in the front step cracked apart and we had to patch it 'temporarily.' We also quickly discovered how annoying it was to have such a tiny step leading to the front door. You almost had to step on the ground to open the door. Such a pain with groceries or babies in hand.
The other annoyance about the way the house was is that there was nothing covering the front door. So if you needed to get in while it was raining, you got wet. Not very inviting.
So, if you have followed the blog for a long time, you'll remember when I found this inspiration picture (at the end of the post). Then I used Photoshop to mock up what I wanted the front to look like when it was done...and the process got started.
The first step was to build the roof extension over the front door. This was done at the same time the new roof was put on (the day I went into labor with baby #4...big day!).
Then, a year or so later, it was time to rip the old siding off of the house and put the new hardi plank/shake siding on.
It was looking better but needed to be painted. After everything was painted we could put up the lights and a mailbox again! We felt great about that progress...but still had more to do because we still had to deal with that tiny step.
We had gotten a bid from a contractor to build out the front for us, but we're gluttons for punishment and decided to diy it. We also couldn't justify spending thousands more when we had already paid so much to remodel every other part of the whole house. Not that the porch was cheap to diy...but definitely cheaper than hiring it out. (We fit right in at Remodelaholic.)
We would have loved to make the entire thing out of concrete but there were two problems with going that route. One is that it was SO expensive $$$. The other problem was that since our house is so old (built in the 1930s) we didn't want to add that much weight to our basement walls. We could have sured them up but it would have been extra $$$ again. Instead, we decided to build a 'deck' and we're really happy with that decision.
Holes were dug and filled with concrete for the wall and step footings.
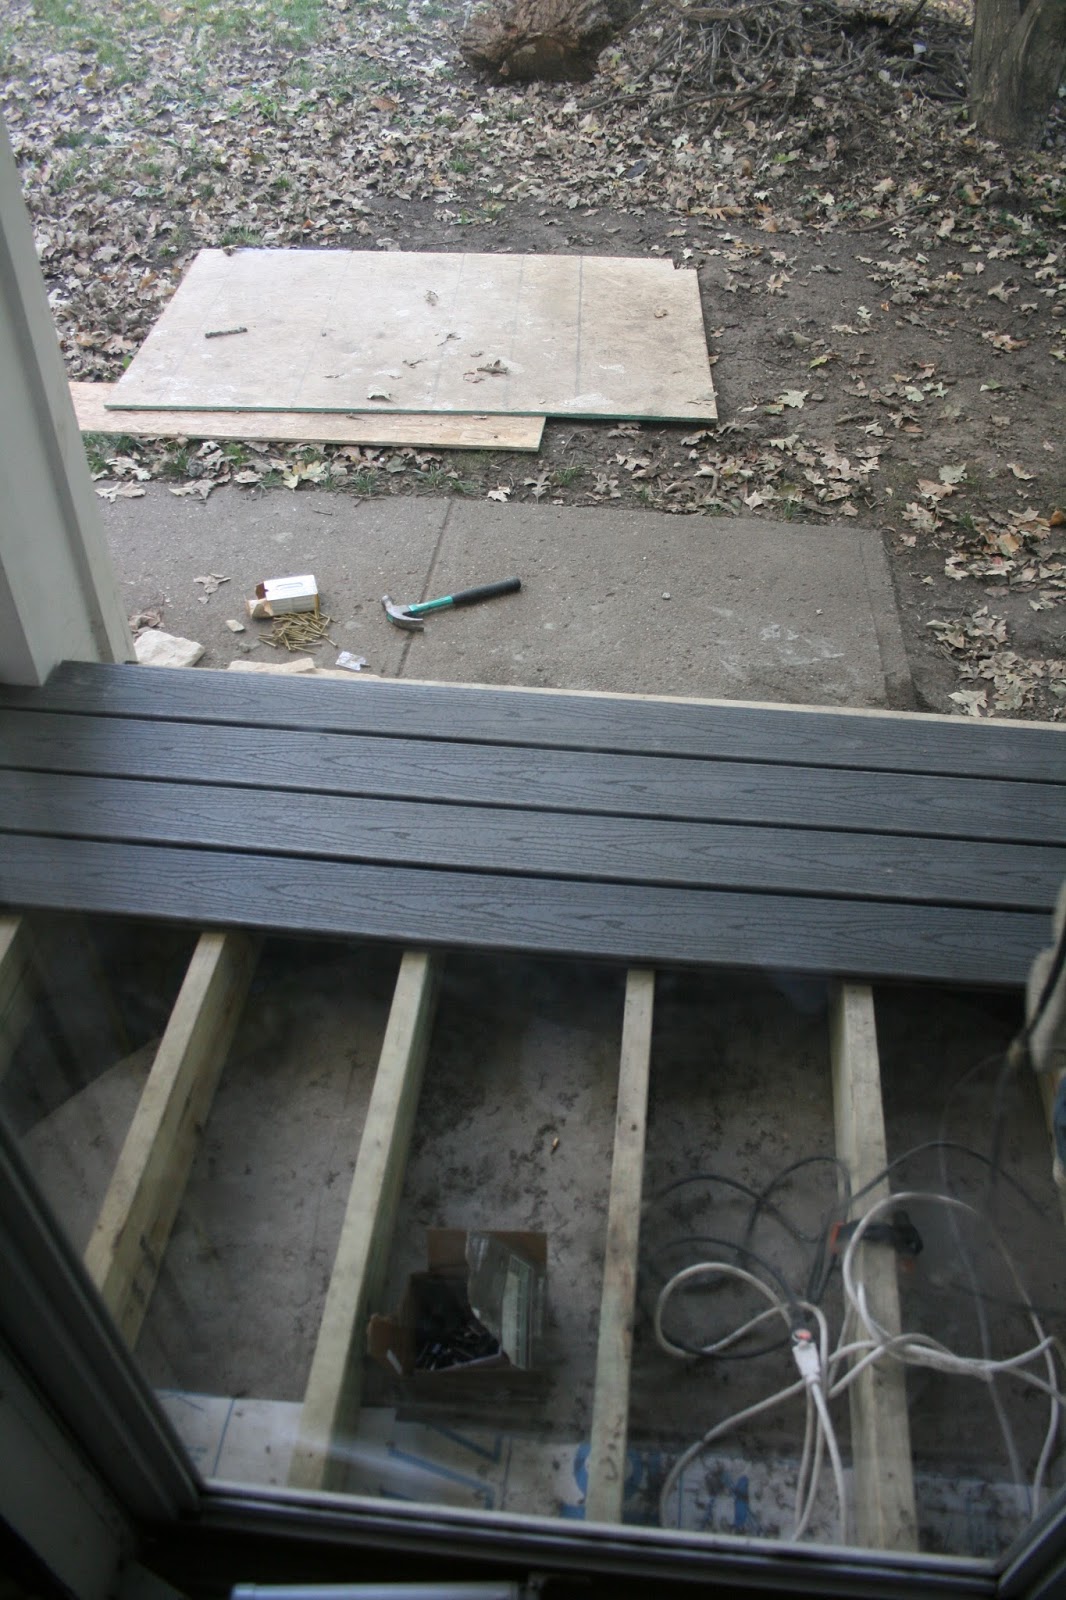
Then Michael built a platform and initially covered it with plywood while we figured out what material we wanted to use as decking.
The side walls were framed up.
And then we found the Trex decking we wanted. We love Trex. Remember this when we wanted a Trex fence and the materials were going to be $19,000?? Well, we finally got our Trex, in a much smaller area and a MUCH smaller price tag.
Then a year went by again because we chose stone for the side walls that we didn't like...returned it...then our stone store messed up our order and we had to wait a whole winter to get the project moving again. But we finally got to add the stone.
The last step in the process was to make the concrete tops for the side walls. I'll be back tomorrow with all the concrete details.
Whew...sorry about the long post but a lot has happened in this little area over the past 3 years. :)
We liked the look before, but soon after we moved in the front step cracked apart and we had to patch it 'temporarily.' We also quickly discovered how annoying it was to have such a tiny step leading to the front door. You almost had to step on the ground to open the door. Such a pain with groceries or babies in hand.
The other annoyance about the way the house was is that there was nothing covering the front door. So if you needed to get in while it was raining, you got wet. Not very inviting.
So, if you have followed the blog for a long time, you'll remember when I found this inspiration picture (at the end of the post). Then I used Photoshop to mock up what I wanted the front to look like when it was done...and the process got started.
The first step was to build the roof extension over the front door. This was done at the same time the new roof was put on (the day I went into labor with baby #4...big day!).
Then, a year or so later, it was time to rip the old siding off of the house and put the new hardi plank/shake siding on.
It was looking better but needed to be painted. After everything was painted we could put up the lights and a mailbox again! We felt great about that progress...but still had more to do because we still had to deal with that tiny step.
We had gotten a bid from a contractor to build out the front for us, but we're gluttons for punishment and decided to diy it. We also couldn't justify spending thousands more when we had already paid so much to remodel every other part of the whole house. Not that the porch was cheap to diy...but definitely cheaper than hiring it out. (We fit right in at Remodelaholic.)
We would have loved to make the entire thing out of concrete but there were two problems with going that route. One is that it was SO expensive $$$. The other problem was that since our house is so old (built in the 1930s) we didn't want to add that much weight to our basement walls. We could have sured them up but it would have been extra $$$ again. Instead, we decided to build a 'deck' and we're really happy with that decision.
Holes were dug and filled with concrete for the wall and step footings.
Then Michael built a platform and initially covered it with plywood while we figured out what material we wanted to use as decking.
The side walls were framed up.
And then we found the Trex decking we wanted. We love Trex. Remember this when we wanted a Trex fence and the materials were going to be $19,000?? Well, we finally got our Trex, in a much smaller area and a MUCH smaller price tag.
Then a year went by again because we chose stone for the side walls that we didn't like...returned it...then our stone store messed up our order and we had to wait a whole winter to get the project moving again. But we finally got to add the stone.
The last step in the process was to make the concrete tops for the side walls. I'll be back tomorrow with all the concrete details.
Whew...sorry about the long post but a lot has happened in this little area over the past 3 years. :)
Jul 8, 2013
Hello...and goodbye
Remember my front door?
Well I recently had a little fun with the back of the front door too. Hello...and goodbye.
I saw the goodbye vinyl decal on GroopDealz a couple weeks ago and thought it would be perfect. It was yellow and just the right size. So now, whether coming or going from my home you'll see a friendly little message.
Do you have anything written on your front door?
And looking through archives I found a little nugget to share from Remodelaholic - yellow doors.
Well I recently had a little fun with the back of the front door too. Hello...and goodbye.
Do you have anything written on your front door?
And looking through archives I found a little nugget to share from Remodelaholic - yellow doors.
Jun 20, 2013
building rock walls
F.i.n.a.l.l.y the weather has cooperated enough for us to begin putting the rock on the exterior of our new front porch area. We bought the stone last October...just in time for the weather to turn nasty. Good timing, huh?
As a reminder, here's a before and after picture of what the front overhang looks like:
We have always planned on putting stone on the side walls between the columns, and also on the front of the steps. Here's the process we used:
First, the hubs measured the walls where the stone would go and sketched out the dimensions on our driveway. Then started putting a pattern together. We did this to make sure we had enough stone and because each box of stone had different pieces. We tried to stay away from the ones that had a yellow tone to them so going through the work of creating the pattern first let us pick and choose the best pieces.
Henry loved watching, and would occasionally sneak out of the house and steal the chalk!
The next step was to mix up the mortar in small batches and start applying the stone to the concrete board. It's almost like buttering bread....you know, if you buttered bread with a trowel.
On the first side he started at the top to make sure the spacing was even. But once he knew the stone was easy to cut or break when needed, he started from the bottom on the other sides. It's much easier to start on the bottom and work your way up, than start at the top and work your way down.
The kids loved watching. They wanted to help, but mean mommy and daddy said 'no.'
Once all the stone was in place and had set, we got a big 'pastry bag' type thing at Lowe's and filled it with grout. The mixed grout went into the bag and could be applied directly in the spaces. Once each space was full, he went back through and smoothed out the grout to make it look nice. The bag worked surprisingly well and made cleanup a whole lot easier since there was no need to scrub extra grout off of the tile.
So far I only have gotten a few pictures of the outside at night...so it's hard to see. But we love the difference the stone makes on the front. MUCH better!
There are still a few things left to finish. Here's the 'to-do' list:
- make concrete tops for each wall
- caulk around the edges of the stone (we didn't grout around the far edges so that the stone could expand as needed - the caulk will be better for that)
- finish the trim around the bottom of the columns
- then someday we'll get around to doing a new sidewalk and make the landscaping look pretty
And I want to say a 'welcome' to Remodelaholic readers. To see more from our whole-house remodel, click here.
As a reminder, here's a before and after picture of what the front overhang looks like:
First, the hubs measured the walls where the stone would go and sketched out the dimensions on our driveway. Then started putting a pattern together. We did this to make sure we had enough stone and because each box of stone had different pieces. We tried to stay away from the ones that had a yellow tone to them so going through the work of creating the pattern first let us pick and choose the best pieces.
Henry loved watching, and would occasionally sneak out of the house and steal the chalk!
The next step was to mix up the mortar in small batches and start applying the stone to the concrete board. It's almost like buttering bread....you know, if you buttered bread with a trowel.
On the first side he started at the top to make sure the spacing was even. But once he knew the stone was easy to cut or break when needed, he started from the bottom on the other sides. It's much easier to start on the bottom and work your way up, than start at the top and work your way down.
Once all the stone was in place and had set, we got a big 'pastry bag' type thing at Lowe's and filled it with grout. The mixed grout went into the bag and could be applied directly in the spaces. Once each space was full, he went back through and smoothed out the grout to make it look nice. The bag worked surprisingly well and made cleanup a whole lot easier since there was no need to scrub extra grout off of the tile.
So far I only have gotten a few pictures of the outside at night...so it's hard to see. But we love the difference the stone makes on the front. MUCH better!
- make concrete tops for each wall
- caulk around the edges of the stone (we didn't grout around the far edges so that the stone could expand as needed - the caulk will be better for that)
- finish the trim around the bottom of the columns
- then someday we'll get around to doing a new sidewalk and make the landscaping look pretty
And I want to say a 'welcome' to Remodelaholic readers. To see more from our whole-house remodel, click here.
Feb 1, 2013
a sigh of relief
It snowed a few days ago...and I'm still completely blown away when I go outside and see snow on our roof and ZERO icicles! Why? Because pre-renovation all of the snow would have melted off the roof and been transformed into huge icicles hanging over our gutters.
That's what caused all the water damage in our house...ice dams built up from snow melting on the roof.
So you can imagine how welcome this sight is...a perfect blanket of un-melted snow on our roof!
Several things contributed to this amazing difference. Here's a little refresher on what the front of the house used to look like from the side:
Here are the things we did to keep the heat INSIDE the house instead of going through the roof and melting the snow:
1. The first thing we did was create an overhang to get the gutters as far away from the walls of the house as possible. Now there's an extra foot or so between the gutters and the house...a perfect spot for additional insulation.
During the process:
And after. It was a lot of work (and money) to get that extra little bit, but ssssooo worth it!
2. We got rid of every hole that previously went through our roof. (except the chimney and plumbing stack that had to stay) This meant we switched from a gas water heater to an electric one so we could plug up as many holes as possible and keep the maximum amount of heat inside the house. In the picture below you can see the gas water heater vent that was plugged up before the foam insulation went in.
3. Speaking of insulation...we tore out every piece of the old insulation in the attic and most of the walls of the house and replaced it with foam. Foam is quite a bit more expensive but again, SO worth it! I feel like this is what made the biggest difference! (by the way, for frame of reference, the picture below is the girls' bedroom) You can also kind of see that the back wall (above Michael's head in this picture) has some slanted wood. Michael added a slant to the ceiling on the back side of the house so that even more insulation would be against the gutters on that side. (plus, it adds character and we like that)
We also got a new high-efficiency furnace, air conditioner, and heat pump. I don't think this had much to do with helping keep the snow from melting on the roof, but it definitely has made our heating bills lower. When we first moved into our house (before any insulation was in the walls), we would keep the heat in the upper 50's in the winter and our heating bills were over $500 a month!! Now, we keep the house at 66 (which feels warm since we don't have cold air rushing in through the walls) and our bills have mostly been in the low to mid $100s.
We're incredibly thankful that all of these little tweaks actually fixed the problem. It's impossible to know if all the money and effort really fixed anything until it actually snowed...and a total relief to see that snow has stayed put on the roof.
Yay for snow!
That's what caused all the water damage in our house...ice dams built up from snow melting on the roof.
So you can imagine how welcome this sight is...a perfect blanket of un-melted snow on our roof!
Several things contributed to this amazing difference. Here's a little refresher on what the front of the house used to look like from the side:
Here are the things we did to keep the heat INSIDE the house instead of going through the roof and melting the snow:
1. The first thing we did was create an overhang to get the gutters as far away from the walls of the house as possible. Now there's an extra foot or so between the gutters and the house...a perfect spot for additional insulation.
During the process:
And after. It was a lot of work (and money) to get that extra little bit, but ssssooo worth it!
2. We got rid of every hole that previously went through our roof. (except the chimney and plumbing stack that had to stay) This meant we switched from a gas water heater to an electric one so we could plug up as many holes as possible and keep the maximum amount of heat inside the house. In the picture below you can see the gas water heater vent that was plugged up before the foam insulation went in.
3. Speaking of insulation...we tore out every piece of the old insulation in the attic and most of the walls of the house and replaced it with foam. Foam is quite a bit more expensive but again, SO worth it! I feel like this is what made the biggest difference! (by the way, for frame of reference, the picture below is the girls' bedroom) You can also kind of see that the back wall (above Michael's head in this picture) has some slanted wood. Michael added a slant to the ceiling on the back side of the house so that even more insulation would be against the gutters on that side. (plus, it adds character and we like that)
We also got a new high-efficiency furnace, air conditioner, and heat pump. I don't think this had much to do with helping keep the snow from melting on the roof, but it definitely has made our heating bills lower. When we first moved into our house (before any insulation was in the walls), we would keep the heat in the upper 50's in the winter and our heating bills were over $500 a month!! Now, we keep the house at 66 (which feels warm since we don't have cold air rushing in through the walls) and our bills have mostly been in the low to mid $100s.
We're incredibly thankful that all of these little tweaks actually fixed the problem. It's impossible to know if all the money and effort really fixed anything until it actually snowed...and a total relief to see that snow has stayed put on the roof.
Yay for snow!
Nov 12, 2012
Evolution of a Door
The back door off of our kitchen has gotten quite a little makeover since we first moved in. We recently completed a tiny project that's pretty much a temporary fix to hold us over until the back door area evolves again (next year?).
Here's a little summary of the changes this little door has faced.
2009. This is my Emma-baby at only 15 months old. In the background you can see the yellow-ish/beige house and an arrow showing the door off of the kitchen. During the renovation we actually moved the door to where the window in this picture is shown by my lovely arrows.
We had some great helpers in the summer of 2010 as we actually moved the doorway. The door used to only be accessible if you opened another door inside the kitchen. (it was pure door craziness - 3 doors within a 4 foot space - one to the outside, one to the kitchen, and one to the garage) It was a very poor layout and the doors would always hit each other, had steps right by them, etc. Moving this door let us have lots more counter space in the kitchen and a much more functional layout. Plus, we ended up putting the new air conditioner/heat pump by the old door opening and had plenty of room. It was a lot of work...but totally worth it!
Here is the door in its new spot, and ready for new insulation and eventually (a year later), siding.
Ahhh...looking much better with the new siding and paint color!
Then I decided to freshen up the color of the exterior doors. Remember this post when you all gave me great suggestions about colors?
Yellow it was! But we still had a big step down to the ground to deal with...errr...actually it was a LACK of steps we had to deal with. Recently my wonderful hubby fixed that problem by piecing together some scrap wood and making a couple steps. Yay for FREE and functional projects!
Then we painted the steps the same color as the house so they look pretty seamless and the kids have a MUCH easier time getting in and out without having to scale up the side of the house to get in! It also means that they can open the door by themselves since they can now reach the doorknob. That's good...and bad. :)
We cleaned out the hostas for the winter and are letting our minds wander in planning a big deck for this area. Not that we need more projects but next year I think there's a grand deck plan and I can't wait!
Here's the evolution of the door from the inside:
Below is the window BEFORE the renovation. It was over the sink. If you look closely, you can see the cracks in the ceiling above the window caused by the water damage.
DURING the renovation. All the cabinets had been removed and walls had been punched a little to see the extent of the damage and amount of mold growing in the walls.
Here is the door to the backyard during the demolition. The wall separating the kitchen and the staircase was removed, both doors you see in this picture were moved, and we got rid of the staircase.
The door has officially found its new home during the renovation.
A year (or two) later and you can see what a difference moving that door made to the kitchen.
I really love looking at progress pictures of the house like this. Sometimes we sit and think "why has this project taken sooooooo long?" This is why. The house has changed SO much thanks to the hard work of my husband and some generous friends and family along the way who have helped! We are super happy now with seeing little changes like the steps to the backyard because they can be done in a weekend and get us ever closer to being DONE with this house craziness!
Here's a little summary of the changes this little door has faced.
2009. This is my Emma-baby at only 15 months old. In the background you can see the yellow-ish/beige house and an arrow showing the door off of the kitchen. During the renovation we actually moved the door to where the window in this picture is shown by my lovely arrows.
Here is the door in its new spot, and ready for new insulation and eventually (a year later), siding.
Ahhh...looking much better with the new siding and paint color!
Then I decided to freshen up the color of the exterior doors. Remember this post when you all gave me great suggestions about colors?
Yellow it was! But we still had a big step down to the ground to deal with...errr...actually it was a LACK of steps we had to deal with. Recently my wonderful hubby fixed that problem by piecing together some scrap wood and making a couple steps. Yay for FREE and functional projects!
Then we painted the steps the same color as the house so they look pretty seamless and the kids have a MUCH easier time getting in and out without having to scale up the side of the house to get in! It also means that they can open the door by themselves since they can now reach the doorknob. That's good...and bad. :)
We cleaned out the hostas for the winter and are letting our minds wander in planning a big deck for this area. Not that we need more projects but next year I think there's a grand deck plan and I can't wait!
Here's the evolution of the door from the inside:
Below is the window BEFORE the renovation. It was over the sink. If you look closely, you can see the cracks in the ceiling above the window caused by the water damage.
DURING the renovation. All the cabinets had been removed and walls had been punched a little to see the extent of the damage and amount of mold growing in the walls.
Here is the door to the backyard during the demolition. The wall separating the kitchen and the staircase was removed, both doors you see in this picture were moved, and we got rid of the staircase.
The door has officially found its new home during the renovation.
A year (or two) later and you can see what a difference moving that door made to the kitchen.
Subscribe to:
Posts (Atom)