As promised yesterday, here's a continuation of the front porch progress with a tutorial on how to make your own concrete countertops.
There are other tutorials out there on how to do this, but we kind of made up our own way of doing it. If you're going to tackle a similar project I recommend you look at several methods and decide what fits your style best. (And while you have the concrete mixed, check out some other things you can made as accessories with it.)
The first, and probably most important step in making your own counters is to measure accurately. We had a little jog that we had to account for in the shape of the counters and each side was slightly different in measurement so the forms had to be adjusted accordingly. Measure carefully!
After that you have to gather your materials. You'll need concrete (we used a countertop mix from Menards).
You'll also need melamine boards, found in any home improvement store (often used for shelving). The key is to find smooth boards if you want a smooth finish.
You'll also need to figure out what you want to use as a support within your counters. You don't want the counters to crack so you need something structural and sturdy inside them. You can buy rebar or make your own. Michael originally planned on making his own, but lucky for him his wife is a genius (ha!) and suggested taking a shortcut with some leftover items we had in the garage.
We used this as the support within the concrete: Can you guess what it is?
It is a shelf bracket from some old closet shelving we used to have. To be honest, I am not a fan of this type of shelving and prefer wood shelves over the metal systems. We sold most of the shelving we had but there were a few miscellaneous pieces left over and now they're buried in our concrete counters!
Basically, Michael cut the shelving down and tied it with plastic zip ties to hold it together. He added some bent pieces of metal that sat on the edge of the forms and enabled the shelving to be suspended in the middle of the concrete (you don't want it settling to the bottom of your form since it is the top of your counter).
For the forms themselves, remember that the bottom of your form will become to the top of your counter when you're finished. So cut a board slightly wider than the counter you need and then tack side boards around it to get the depth you want.
You'll also need to use some silicone caulk to fill in the gaps so your edges are nice and smooth. This edging tool was handy for spreading the caulk evenly inside the form.
Once your forms are ready, it's time to mix the concrete. A big plastic bin worked well for mixing. Just follow the instructions on the bag. We started out mixing it with the mixer attachment on a drill, but switched to using a shovel. Much easier.
After pouring the concrete into your forms, you can use a sander on the edge of the form to vibrate the concrete and bring the air bubbles out.
Lots of air bubbles.
We wanted to make sure the forms were completely filled, which meant overfilling them a little. We scraped the top with a board to make sure they were level with the top of the form. Warning - this is a super messy process.
After allowing the concrete to dry (we waited 48 hours) you can release the counter from the form using pliers to pull out the metal pieces that hung over the form and then breaking off pieces of the form.
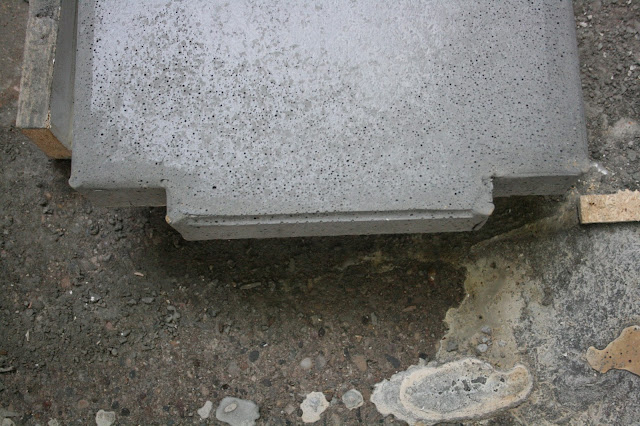
Now here's the most nerve-wracking part...turning it over to see how the counter looks. Overall, we were thrilled with our first attempt at making these. You can see below that there is one part where the silicone wasn't smoothed down (oops), but you don't notice it in the installed version since there is caulking around the whole counter.
There were more bubbles in the top than we expected, but since it's an outdoor counter it's not a big deal. In the future I think we'd use the sander on the frame for a longer time. We sanded the whole top to make sure it was nice and smooth and then it was time to install it.
It fit beautifully! Like it was made for the space. :) The last step was to caulk around the edges of the stone and concrete so everything was sealed well.
We decided not to seal the concrete top because we tossed around the idea of coloring it a little in the future. Maybe we'll end up sealing it...not sure yet.
Other than the concrete top, the final thing we had to do to finish the front porch was trim out the bottom of the columns. They turned out great!
And here's the before and after again:
It is so great to finally have ONE whole area finished. I can't wait for the holidays this year so I can decorate out here. We added outlets on the outside since we didn't have any before so I can actually have lights outside! Can't wait!
Aug 13, 2013
Subscribe to:
Post Comments (Atom)


0 comments:
Post a Comment