Yesterday we showed you the disaster that was our bathroom. We punched a hole in the wall to put some storage into a tiny bathroom that was seriously lacking in that department.
But take a look now...
It's storage AND art!
We painted the little nook after Michael made a shelf for it. Then we put a hinge on a 25x25" Pottery Barn frame that I found in the 'as is' section. It was off white so we painted it with some oil rubbed bronze spray paint and voila! A hidden little storage area.
The picture sits perfectly flat against the wall so you really can't tell it opens up. Michael placed little screws on the back of the frame and has magnets inside the hole to hold the frame tight.
It's a GREAT addition to this bathroom so we can store toothbrushes, and all those other little annoying bottles that you need in a bathroom.
Jan 15, 2013
Dec 19, 2012
Books and more books
A year ago (!) I bought some book ledges at IKEA with big plans to put them up in the kids' rooms to hold their vast collection of books.
Our nearest IKEA is 4 hours away so I had snatched them up when I had the chance...and then these nice little shelves just sat around waiting for their turn to be used...for over a year! (and several more trips to IKEA) Michael could have made the simple shelves easily, but to be honest, IKEA is so cheap it wouldn't have saved much money! (and the project it took a year to do would have taken 2 years with everything else we have going on)
We finally put them up last week in the girls' room and I'm so happy with them!
The kids have more books than I can keep track of. What you see here is probably a third or so of the books we actually have. (and they're getting more for Christmas!) There's an entire bin in the basement dedicated to the kids' books in Spanish and one or two more bins full of English books. Both Michael and I collected Spanish children's books because our children would, of course, be bilingual. HA! Epic fail on that one! From time to time the girls will ask me to read them a book in Spanish, but they lose interest after a while. Clifford the Big Red Dog just doesn't make much sense to them en espanol!
Long ago we learned to hide the best books and keep them somewhere only Mommy and Daddy could reach because of how 'loved' our books have gotten by our kids. Lots of torn pages and chew marks just mean they are well loved, right?
So we wanted to hang the shelves high enough to put some books out of reach...even for Elliott.
Speaking of Elliott...he is reading!! It's amazing to watch your kids learn to read. In the last month or so he's gone from knowing some words to being able to figure out just about any word in a kids' book. He now can choose a book from the shelf to take to bed with him and we can hear him reading to Henry at night! Precious!
Switching subjects now...these pictures have jogged my memory to post about the pouf you can see next to the book ledges. I made that months ago and never posted about it. I have a tutorial to share and everything. Soon.
Our nearest IKEA is 4 hours away so I had snatched them up when I had the chance...and then these nice little shelves just sat around waiting for their turn to be used...for over a year! (and several more trips to IKEA) Michael could have made the simple shelves easily, but to be honest, IKEA is so cheap it wouldn't have saved much money! (and the project it took a year to do would have taken 2 years with everything else we have going on)
We finally put them up last week in the girls' room and I'm so happy with them!
The kids have more books than I can keep track of. What you see here is probably a third or so of the books we actually have. (and they're getting more for Christmas!) There's an entire bin in the basement dedicated to the kids' books in Spanish and one or two more bins full of English books. Both Michael and I collected Spanish children's books because our children would, of course, be bilingual. HA! Epic fail on that one! From time to time the girls will ask me to read them a book in Spanish, but they lose interest after a while. Clifford the Big Red Dog just doesn't make much sense to them en espanol!
Long ago we learned to hide the best books and keep them somewhere only Mommy and Daddy could reach because of how 'loved' our books have gotten by our kids. Lots of torn pages and chew marks just mean they are well loved, right?
So we wanted to hang the shelves high enough to put some books out of reach...even for Elliott.
Speaking of Elliott...he is reading!! It's amazing to watch your kids learn to read. In the last month or so he's gone from knowing some words to being able to figure out just about any word in a kids' book. He now can choose a book from the shelf to take to bed with him and we can hear him reading to Henry at night! Precious!
Switching subjects now...these pictures have jogged my memory to post about the pouf you can see next to the book ledges. I made that months ago and never posted about it. I have a tutorial to share and everything. Soon.
Jun 20, 2012
Hello. Yellow.
I can FINALLY share the new door color! Some will think it's crazy. I think it's fun and happy.
After hearing from everyone on this post my mind was made up. I had been wanting a yellow door but Michael wasn't sure it would look good. Lucky for me...he had to work out of town and was gone for a whole week. When he came back the door was yellow. :) Sneaky, yes. But sometimes you have to see it before you know if you like it.
For now...we like it. Although I've already picked out a fiery red that I may paint it when we get closer to the Fall. The yellow/gray color combination is an obvious trend right now...but the beautiful thing about painting a door is that it only takes a couple hours...and $20 or less. Not bad for a big change.
Just take a look at the before and after. Hello. Yellow.
I knew I wanted words for the front door and after seeing the color a word came to mind. This yellow color screams the word HELLO to me.
I ordered the words from UppercaseLiving although, sadly, I don't think I'll ever order anything from them again. It took 2 weeks for the simple letters to arrive...and they were the wrong color! It's supposed to be black! For now, I'm going to leave the white lettering and maybe go buy a mini Cricut to make my own phrases whenever I want.
Colors:
The color of the exterior of our house is called Urbane Bronze from Sherwin Williams. (It's actually part of the new HGTV collection.) We used their best exterior paint called Duration, in satin. I LOVE this color. To me, it looks gray most of the time but in certain light it has a brown undertone. Michael only sees brown in it, no gray at all. It's weird how two people can see colors so differently!
The door color is also from Sherwin Williams...called Cheerful. (and cheerful it is) I went to Lowe's to check out a few other color options and, since I was already there when I decided on Cheerful, I color matched it to a Valspar paint. Beautiful!
I painted 3 exterior doors with this yellow color...along with two light fixtures and I'm working on cheer-ing up a couple other things with this color for the outside of our house. I'll share the rest of the yellow party once it's all done.
So what do you think? Crazy? Or cheery?
May 22, 2012
Exterior color...revealed!
Remember this post where we asked your opinion on which color we should paint on the exterior of our house? Well...it's time to show you what we chose...
Dark Gray! And we l.o.v.e it!!
Sadly, we're not done yet. This project is taking FOREVER! We decided to save some money and diy the painting. On the one hand, each time we go out with our paint brushes we are happy about the fact we're saving $1500+ doing it ourselves...but on the other hand, we are SO SICK of painting and wish we could hire someone to finish it. The pictures on this post show the not-quite-finished job. The trim is done but the gray areas still need another coat. (and we've only been able to paint as high as we can reach so far)
But we get major encouragement when we see the before and afters. Yahoo!
What used to look like this from the front:
Now looks like this: (remember to just look at the house...the yard and landscaping are trashed right now)
And here's the difference in looking at the side of the house.
Back to the painting process...
We have spent days painting. Whoever had the idea of using shakes all over the house was insane! Oops...it was me. And yes, it was insane. It looks gorgeous but the process is extremely tedious. Here's why:
There are tiny little grooves everywhere that can only be painted with a one inch brush!
Yes, yes, we know...it could probably be sprayed a little faster. But we're cheap! We have a paint sprayer but were told that you need about 20-25% more paint when you spray because of all the wasted over-spray and paint that gets stuck in the sprayer. (and paint is expensive with a capital $Cha-ching so 25% would be several hundred dollars worth of paint) Plus, even if we sprayed, we'd have to use a little brush to make sure the paint gets crammed in every little nook and cranny.
Last weekend we made a lot of progress on the back of the house. It was encouraging to look over from where I was hard at work painting and see this progress:
And then completely deflating to look up and see that half of the back is still completely untouched:
Grrrrr. Guess what we'll be doing this Memorial Day weekend?
The kids love when we paint because they get to play outside for the entire day. Although this little guy will be glad when we're done since he gets in trouble constantly for touching the wet paint. Poor baby.
Dark Gray! And we l.o.v.e it!!
Sadly, we're not done yet. This project is taking FOREVER! We decided to save some money and diy the painting. On the one hand, each time we go out with our paint brushes we are happy about the fact we're saving $1500+ doing it ourselves...but on the other hand, we are SO SICK of painting and wish we could hire someone to finish it. The pictures on this post show the not-quite-finished job. The trim is done but the gray areas still need another coat. (and we've only been able to paint as high as we can reach so far)
But we get major encouragement when we see the before and afters. Yahoo!
What used to look like this from the front:
Now looks like this: (remember to just look at the house...the yard and landscaping are trashed right now)
And here's the difference in looking at the side of the house.
Back to the painting process...
We have spent days painting. Whoever had the idea of using shakes all over the house was insane! Oops...it was me. And yes, it was insane. It looks gorgeous but the process is extremely tedious. Here's why:
There are tiny little grooves everywhere that can only be painted with a one inch brush!
Yes, yes, we know...it could probably be sprayed a little faster. But we're cheap! We have a paint sprayer but were told that you need about 20-25% more paint when you spray because of all the wasted over-spray and paint that gets stuck in the sprayer. (and paint is expensive with a capital $Cha-ching so 25% would be several hundred dollars worth of paint) Plus, even if we sprayed, we'd have to use a little brush to make sure the paint gets crammed in every little nook and cranny.
Last weekend we made a lot of progress on the back of the house. It was encouraging to look over from where I was hard at work painting and see this progress:
And then completely deflating to look up and see that half of the back is still completely untouched:
Grrrrr. Guess what we'll be doing this Memorial Day weekend?
The kids love when we paint because they get to play outside for the entire day. Although this little guy will be glad when we're done since he gets in trouble constantly for touching the wet paint. Poor baby.
Mar 6, 2012
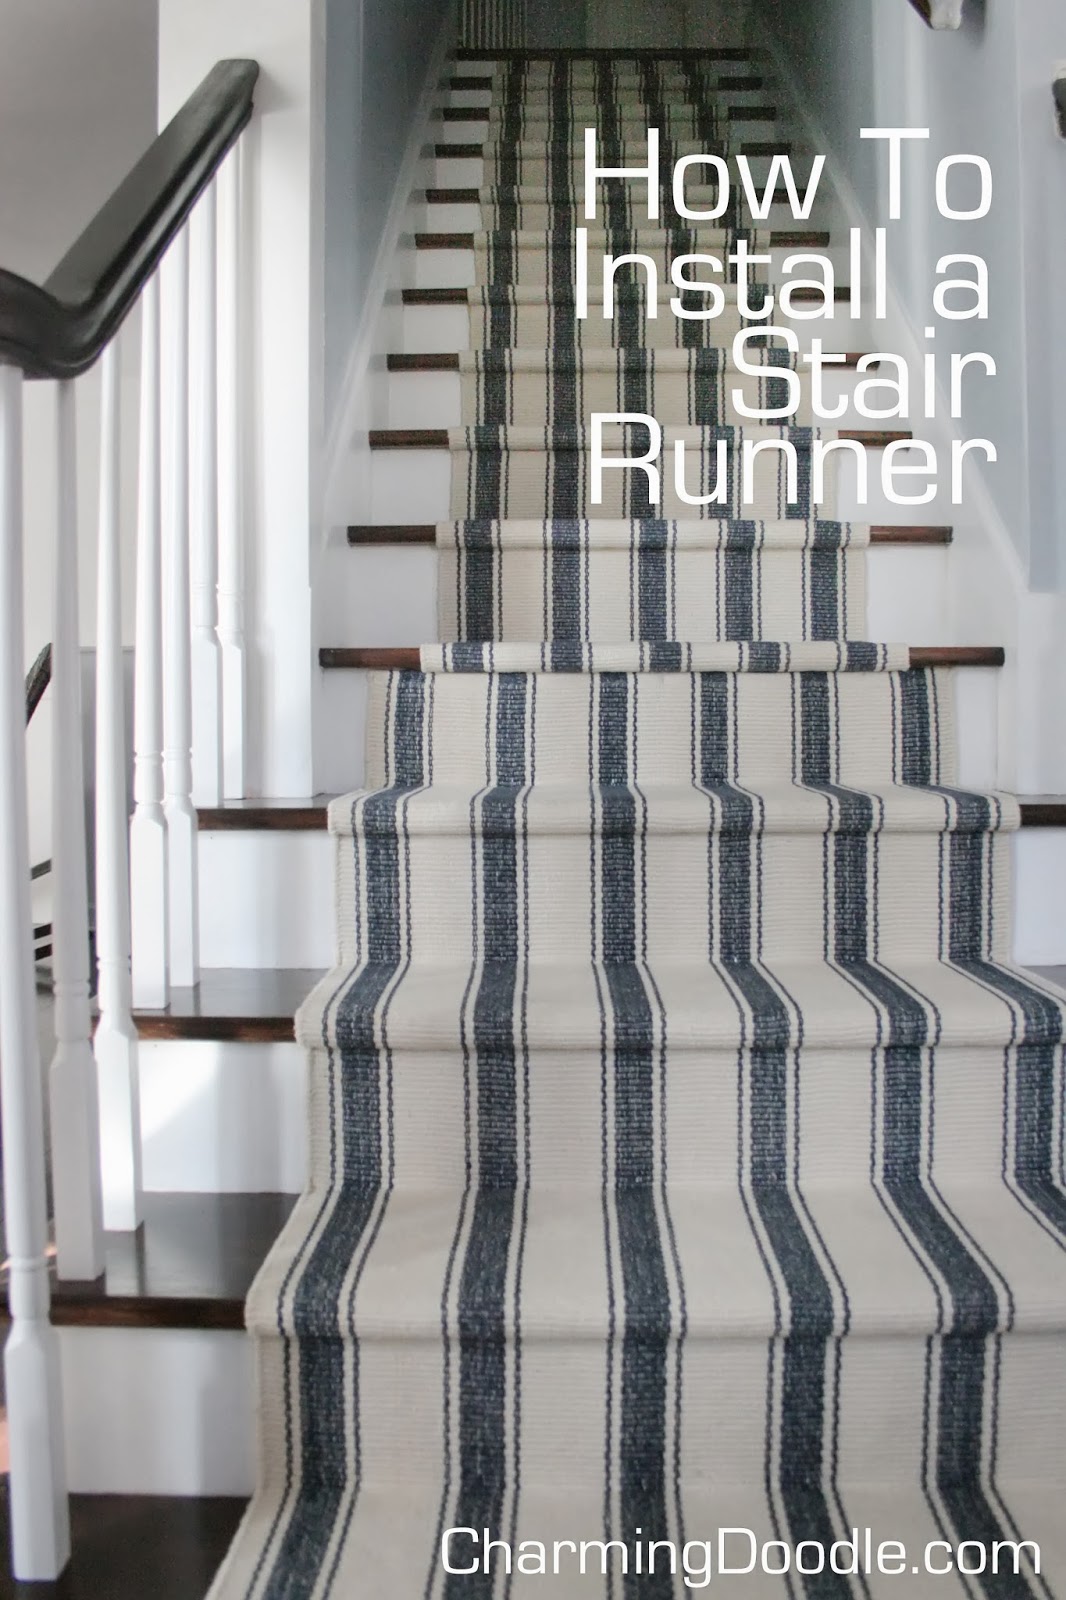
the winning runner revealed
Thanks for all the great comments and thoughts about our stair runner choice. Most of the votes were split between option number 1 and 2 from our previous post with lots of commenters and facebook friends saying they liked number 2 and 5.
We liked them all for different reasons but installed our choice this past weekend.
Before I show you that...let me show you how our stairs looked the day before the runner was installed:
Isa likes to line her babies up for naps and it makes me giggle to see them on the stairs like this. (and I have no idea why none of them have clothes...hmmmm)
OK - down to the reason for this post. For review, here are the choices we had.
And we chose runner number...............ONE!
A couple thoughts on some of the other runners...
#2 - We liked it but once we saw it on the stairs the main color that popped out was the orange in it. If we would have had orange on the main level somewhere...anywhere...we would really have liked it, but we don't so it just didn't flow well.
#3 - It's really similar to the one we chose and our dining room rug...but we thought it might make us a little dizzy if there was a huge amount of those tiny stripes. And being dizzy while walking down a set of stairs is a little dangerous. :)
#4 - LOVE! I loved this one. The sample we were sent was actually a pillow sham and guess what....we kept it! It's my 'second option' for bedding so when I get antsy and want to change the look of our bed I get out this monster sham and it's perfect!
#5 - I also loved this one but didn't like the feel of it since it was a really scratchy outdoor fabric. Great for cleaning, I'm sure, and the look was perfect...but not the right choice knowing my baby had to crawl up and down the stairs for a while on a brillo pad-ish fabric. Ouch.
Where are these rugs from?
I sourced lots of different rugs and finally found Dash&Albert. They are by far the most beautiful and stylish for the money. It turns out that a nearby store was a dealer for them and shipped everything to us for free which was also a bonus.
Here's the process:
The first step was to touch up painting on the white backs of the stairs and the ballusters. There were some little splashes from the stain that I could NOT cover. I tried Kilz Stain Blocker and then layers and layers of Sherwin Williams white SuperPaint on top - and can still see the stains. Grrrr. Any suggestions to cover those areas better?
To keep cost down we didn't order a continuous runner...but you'd never know! We got 4 different 2x3 rugs and one that was 3x5 since the bottom stairs are wider and we wanted the runner to be wider as well.
The tools: a ruler, pencil, scissors, scraps of an old rug pad (and then a couple new rug pads because we underestimated what we needed), and an upholstery air-powered staple gun (and special staples to fit the gun that took me a day to track down).
I found the center point of the stair and started stapling the first rug at the top. The goal was to only staple on the white wood and try to keep staples off of the stair tread itself in case we ever want to pull the runner off.
We cut a piece of rug pad to fit each stair underneath the rug. It is amazing how much cushion this added AND it made the rug less likely to slide. I tried my best to stretch the rug itself really well before stapling it to make sure it wasn't going to loosen much as we walk on it - and I think having this pad underneath will help with that too. (and note - most of the rug pad pieces were larger than this and wrapped around the bottom of the step it was on...this one happened to be cut when we were running out of our rug pad - oops!)
The completed stair runner. See how the stripes stop matching when we switch to the wider runner? The hubs hates that but I don't mind it at all. It was a necessary thing because of the way the rugs are cut.
And a view from the top. The kids love it...although they complained at first that they couldn't "slide down the stairs" anymore on their bums. Score another one for mom! This was an added benefit of the runner...because let me tell ya...it's scary watching your babies tumble down the stairs because they were trying to slide head first or lay straight on their backs. Scary...and it can't happen anymore. :)
I still think wood stairs sans-runner would be the most beautiful option. But with the safety concerns with kids (and me...those stairs were slippery if you tried to go down them in socks...and had a wiggly baby in your arms). I'm pretty happy with the fun stripe-y rug.
Dec 9, 2011
Merry Christmas to Me!
Santa's Elves woke me up at a crazy hour this morning (6am...and for me that is e.a.r.l.y) but I didn't mind because it was almost like my very own Christmas morning!
The Elves...were actually two men from Williams-Sonoma's delivery company and they were here to bring my dream dining table right into my dining room!
They call it 'white glove' service and they weren't even kidding about that...the guys actually wore white gloves!
And they left me with the most beautiful beat-up, scratched, dented, old looking table...I love it! The hubs and I have beenstalking Pottery Barn looking at this table for 2 whole years and finally had enough cash-back saved up on our Discover card that we could buy the table for almost free.
The 'rustic' look was really important to us since 4 children are a bit hard on furniture (to say the least). But with this table they can stick forks in it and you won't be able to tell.
There were a couple little scratches that we noticed this morning and the delivery guy got a black permanent marker (no lie) from his truck and made the scratches completely disappear. That's my kind of table!
And it seats 12...so who wants to come over for dinner???
Oh wait...little problem...I still don't have a working stove or even microwave so we might have to wait a little while longer for that. But when I can cook again...who wants to come over?? :)
The Elves...were actually two men from Williams-Sonoma's delivery company and they were here to bring my dream dining table right into my dining room!
They call it 'white glove' service and they weren't even kidding about that...the guys actually wore white gloves!
And they left me with the most beautiful beat-up, scratched, dented, old looking table...I love it! The hubs and I have been
The 'rustic' look was really important to us since 4 children are a bit hard on furniture (to say the least). But with this table they can stick forks in it and you won't be able to tell.
There were a couple little scratches that we noticed this morning and the delivery guy got a black permanent marker (no lie) from his truck and made the scratches completely disappear. That's my kind of table!
And it seats 12...so who wants to come over for dinner???
Oh wait...little problem...I still don't have a working stove or even microwave so we might have to wait a little while longer for that. But when I can cook again...who wants to come over?? :)
Nov 30, 2011
The Best Bed EVER
Did you know I love Pottery Barn?? It's quite an understatement, actually. But so much of what they have just seems to perfectly fit what I need.
Like this bed for instance...
When the hubs and I decided to give the girls our bedroom upstairs...we moved into a much smallercracker box bedroom. We went from having our bed, night stands, dressers, and even a pool table (yes, we had a pool table in our room for a year or two)...to having just enough room for our bed and night stands. We also went from each having our own walk-in closet, to sharing a teeny tiny one. Oh the sacrifices of being a parent! :)
Since our new master is so 'cozy' a bed like the one above is exactly what we needed. And what's not to love about the pretty white bed from Pottery Barn with lots of room in those spacious storage drawers? Ummmm...the price! There aren't any circumstances where I can see myself shelling out over $1,700 for a bed frame.
BUT...what if there was a way to make something similar? Welcome to my life Ana White! A friend of mine (thanks Jen!) told me a long time ago about a website that gave 'knock off' furniture plans for some popular stores. (like Pottery Barn) And wouldn't you know it...she had plans for the bed with drawers.
We planned to make the bed after getting everything else in the house settled. But I decided to ask my Dad to help me make it while we were living with my parents. Even though "drawers are the hardest thing to make" he agreed and we began working on it over July 4th weekend as a SURPRISE to my husband!
It just so happened to be one of the hottest weekends of the year! The kids enjoyed the a/c inside while watching us work. We cut big sheets of plywood down into pieces (thanks to my parent's neighbor for letting us borrow his saw)...
And fit them together to begin making each 'bench.' The bed is essentially made up of 3 benches, each containing 2 drawers.
The iPad is the one of my favorite things and got a new use...it let me see the plans while we were working.
One of the benches coming together...
And here's the rough trim on all 3.
A cabinet-maker friend made the actual drawer boxes for us and also the drawer fronts. Although...we basically had to remake the fronts because as you'll see in the picture below...all those little routered grooves were his artistic vision and not mine. The kids had fun playing in the drawer boxes though!
Here is one bench assembled after it was painted and the hardware was put on. We modified the plans so that the drawer fronts are recessed back a little from the bench frame. It think it gave them just the right look.
And this is how the three benches fit together in the room.
We put it together and surprised the hubs. He had no idea we had been working on this top-secret project over the past few months. We love the bed and the space it gives us...and he's very relieved that he doesn't have another project hanging over his head. Make bed with drawers...check!
The mattress for the bed has a crazy story all its own...but I'll save it for another post. I really debated about posting a picture of the bed as it is today...since the room is not at all finished (nothing on the walls...missing bedding...no headboard yet...etc.) but here's a peek at what the room and bed look like right now.
I'd say it's about as close as you could get to the Pottery Barn version...but better because the total cost was only about $350. (and I.don't.know.how.many.man.hours) Thanks Dad!!
And since I didn't have to spend as much on a bed...I bought the curtains and mercury glass pendants you see above. And guess where I got them... ;)
Like this bed for instance...
When the hubs and I decided to give the girls our bedroom upstairs...we moved into a much smaller
Since our new master is so 'cozy' a bed like the one above is exactly what we needed. And what's not to love about the pretty white bed from Pottery Barn with lots of room in those spacious storage drawers? Ummmm...the price! There aren't any circumstances where I can see myself shelling out over $1,700 for a bed frame.
BUT...what if there was a way to make something similar? Welcome to my life Ana White! A friend of mine (thanks Jen!) told me a long time ago about a website that gave 'knock off' furniture plans for some popular stores. (like Pottery Barn) And wouldn't you know it...she had plans for the bed with drawers.
We planned to make the bed after getting everything else in the house settled. But I decided to ask my Dad to help me make it while we were living with my parents. Even though "drawers are the hardest thing to make" he agreed and we began working on it over July 4th weekend as a SURPRISE to my husband!
It just so happened to be one of the hottest weekends of the year! The kids enjoyed the a/c inside while watching us work. We cut big sheets of plywood down into pieces (thanks to my parent's neighbor for letting us borrow his saw)...
And fit them together to begin making each 'bench.' The bed is essentially made up of 3 benches, each containing 2 drawers.
The iPad is the one of my favorite things and got a new use...it let me see the plans while we were working.
One of the benches coming together...
And here's the rough trim on all 3.
A cabinet-maker friend made the actual drawer boxes for us and also the drawer fronts. Although...we basically had to remake the fronts because as you'll see in the picture below...all those little routered grooves were his artistic vision and not mine. The kids had fun playing in the drawer boxes though!
Here is one bench assembled after it was painted and the hardware was put on. We modified the plans so that the drawer fronts are recessed back a little from the bench frame. It think it gave them just the right look.
And this is how the three benches fit together in the room.
We put it together and surprised the hubs. He had no idea we had been working on this top-secret project over the past few months. We love the bed and the space it gives us...and he's very relieved that he doesn't have another project hanging over his head. Make bed with drawers...check!
The mattress for the bed has a crazy story all its own...but I'll save it for another post. I really debated about posting a picture of the bed as it is today...since the room is not at all finished (nothing on the walls...missing bedding...no headboard yet...etc.) but here's a peek at what the room and bed look like right now.
I'd say it's about as close as you could get to the Pottery Barn version...but better because the total cost was only about $350. (and I.don't.know.how.many.man.hours) Thanks Dad!!
And since I didn't have to spend as much on a bed...I bought the curtains and mercury glass pendants you see above. And guess where I got them... ;)
Aug 16, 2009
Gorgeous family
Subscribe to:
Posts (Atom)